

Introduction
Metal fragments in food are not rare. A broken mixer blade, a worn conveyor bearing, or a stray staple from a raw-material sack can end up in a finished product before anyone notices.
USDA-FSIS's 2025 recall data shows foreign material caused more recalls than any other single category that year. That figure covers meat, poultry, and egg products alone, and metal fragments are among the most common culprits behind it.
That's why metal detection shows up in nearly every HACCP plan and across food safety schemes like BRCGS, SQF, and FSSC 22000. Regulators don't hand out one universal mandate, but risk assessments almost always land in the same place: install a detector, validate it, and monitor it constantly.
This guide walks through how metal detectors work, what compliance actually requires, and how to pick the right system for your production line.
Key Takeaways
- Metal contamination remains a leading cause of food recalls, making detection a near-default HACCP control point
- Three-coil systems detect ferrous, non-ferrous, and stainless steel contaminants, though stainless is hardest to catch
- Wet or salty products need phase-correction technology to avoid false rejects from natural product conductivity
- Validation proves a detector can catch contaminants; verification confirms it's doing so during actual production
- The choice between metal detection and X-ray hinges on packaging type, contaminant risk, and budget
What Are Metal Detectors for Food Safety?
Metal detectors for food safety are electromagnetic inspection systems built into production and packaging lines. They scan every unit passing through an aperture or across a conveyor, flag any metallic signal, and trigger an automatic reject before contaminated product reaches a customer.
Foreign material contamination isn't hypothetical. USDA-FSIS's 2025 recall data lists it as the single largest cause of meat, poultry, and egg recalls that year, and metal fragments account for a meaningful share of those incidents.
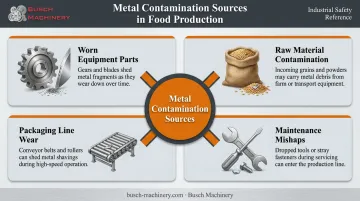
Metal enters food production through more paths than most people expect:
- Worn or broken equipment parts, such as blades, screens, or bearings
- Raw materials arriving with tramp metal already inside
- Packaging line components that shed fragments over time
- Maintenance activities, including dropped tools or hardware
Because this hazard is so foreseeable, metal detection appears constantly across food safety frameworks. FDA's Preventive Controls rule (21 CFR 117) requires manufacturers to analyze and control foreseeable physical hazards, including metal fragments, though it stops short of naming a specific technology.
GFSI-recognized schemes get more specific about what's expected:
- BRCGS Issue 9 requires metal detection unless a risk assessment proves it wouldn't improve safety
- SQF Edition 9 requires risk-based detection limits and routine verification
- FSSC 22000 Version 6 requires documented justification if a site skips metal detection
Beyond consumer protection, detectors serve a second purpose: they protect equipment downstream. A metal fragment that slips past inspection can chip a blade, jam a pump, or destroy a filler head, turning a small contamination event into an expensive repair and a shutdown.
How Do Metal Detectors Work?
Every metal detector on a food line relies on the same basic principle: electromagnetic fields respond differently when metal enters them. The engineering gets more sophisticated from there, but that's the foundation.
The Three-Coil Electromagnetic System
Most food-grade detectors use a balanced three-coil head. According to Loma Systems' guide to metal detection, a central transmitter coil generates a continuous electromagnetic field. Two receiver coils sit on either side, wired so their signals cancel each other out when nothing but product passes through.
Metal disrupts that balance. Whether it's a ferrous screw or a stainless shard, any conductive or magnetic object passing through the aperture throws the receiver signals out of sync. The detector reads that imbalance and calculates whether it matches a genuine contaminant or just normal product variation.
Detectability by Metal Type
Not all metals show up the same way. Ferrous metals are the easiest to catch because they're both magnetic and conductive, giving the detector two signals to work with. Non-ferrous metals like aluminum or copper are moderately detectable since they're conductive but not magnetic.
Stainless steel is the tough one. Most food-grade stainless is non-magnetic and a relatively poor conductor, producing a weaker signal than either of the other two categories.
| Metal Type | Detectability | Why |
|---|---|---|
| Ferrous | Easiest | Magnetic and conductive |
| Non-ferrous | Moderate | Conductive only |
| Stainless steel | Hardest | Low conductivity, non-magnetic |
The Product Effect Challenge
Wet, salty, or high-moisture foods create a genuine headache for detectors. Meat, cheese, brine-packed seafood, and similar products conduct electricity on their own, generating a signal that can mimic metal.
Left uncorrected, this "product effect" forces operators to accept more false rejects or dial back sensitivity, raising the risk of missing real contaminants.
Manufacturers counter this with phase-correction and frequency-based discrimination, technology that separates the product's own signal from a genuine metal response. Multi-frequency systems, which scan at more than one frequency simultaneously, handle difficult wet products better than single-frequency units.
Automatic Rejection Mechanisms
Once a detector confirms a contaminant, the product still needs removal from the line. Three mechanisms typically handle that job:
- Air blast: A burst of compressed air knocks lightweight or small packages off the line
- Pusher arm: A mechanical arm physically pushes the rejected item into a bin
- Stop-and-alarm: The line halts entirely and alerts an operator to remove the item manually
The right choice depends on product weight, package size, and line speed. High-speed lines usually favor air blast or pusher arms since neither interrupts flow, while stop-and-alarm systems suit slower operations where manual intervention isn't a bottleneck.
Types of Metal Detectors Used in Food Production
Different products need different detector configurations. Matching the format to the product is half the battle.
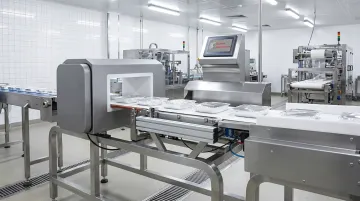
Conveyor belt detectors are the most common setup on a food line. They sit at final packaging inspection, scanning boxed, bagged, or wrapped goods as they move through on a belt. If you picture a typical metal detector, this is likely the image that comes to mind.
Not every product moves along a belt, though. Gravity-feed detectors handle free-flowing dry ingredients, think grains, flour, or sugar, as they drop through a vertical chute. Pipeline detectors serve the opposite end of the texture spectrum: pumped liquids, purees, slurries, and pastes moving through enclosed piping rather than open air.
Packaging material adds another variable. Foil and metalized packaging create a specific problem: a conventional detector can't easily distinguish a foil wrapper from an actual metal contaminant, since both produce a conductive signal. Two common workarounds exist:
- Ferrous-in-foil detectors: Use magnetic-field detection tuned specifically to catch magnetic contaminants inside foil-wrapped products
- X-ray inspection: Bypasses the foil problem entirely by using density differences instead of electromagnetic fields
Facilities running foil-heavy packaging, such as ready meals in foil trays, often inspect product before it reaches the wrapping stage. They then rely on one of these solutions for a final check after packaging. Busch Machinery offers metal detector and check weigher combination systems for this final inspection step.
Metal Detection & HACCP: Critical Limits, Validation, and Monitoring
Metal Detection & HACCP: Critical Limits, Validation, and Monitoring
Metal detection is almost always treated as a Critical Control Point in a HACCP plan, or as a preventive control under FSMA's hazard analysis requirements. That status brings documentation obligations that extend far beyond simply installing equipment.
Setting Critical Limits
Critical limits define the smallest contaminant size a detector must reliably catch. Equipment manufacturers commonly reference benchmarks such as 1.5mm ferrous, 2.0mm non-ferrous, and 2.5mm stainless steel spheres for dry products, with wet or high-moisture products sometimes needing larger thresholds because of the product effect.
These figures aren't a fixed regulatory standard. SQF Edition 9 requires each site to set its own detection limits based on a risk assessment of its specific product and packaging, and retailer specifications frequently demand tighter limits than any generic benchmark suggests. Treat published sphere sizes as a starting point for discussion with your equipment supplier, not a compliance checkbox.
Validation vs. Verification
Although often used interchangeably, these two terms have distinct meanings in a HACCP plan.
Validation proves the system can detect and reject a contaminant at its critical limit. This process occurs during commissioning or after a major change, using certified test pieces run through the line at full production speed.
Verification confirms the system is detecting contaminants during ongoing production. It is the recurring check that happens every shift to ensure continued performance.
FDA's HACCP guidance draws this same distinction: validation establishes that a control, properly implemented, will actually work, while verification and monitoring confirm the system operates as planned day to day.
Standard Monitoring Schedule
A typical testing cadence looks like this:
- Startup check – before production begins, confirming the detector functions correctly
- Periodic checks – roughly every 30-60 minutes during a run, though manufacturer guidance and site risk assessments should set the exact interval
- Changeover checks – whenever the product or packaging changes
- Shift-end check – confirming performance held throughout the entire run
Corrective Action When a Test Fails
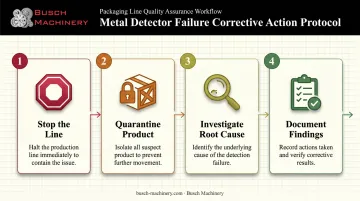
A failed verification check isn't a minor issue. It triggers a defined response:
- Stop the line immediately
- Quarantine all product made since the last successful check
- Investigate the root cause, such as calibration drift, a sensitivity setting, or a mechanical fault
- Document everything, including the failure, the investigation, and the resolution
Skipping any of these steps leaves a gap in the traceability record that auditors catch quickly.
Choosing the Right Metal Detector for Your Facility
Picking a detector isn't just about brand names. The right system depends on how well it matches your product, your line, and your facility conditions.
Product characteristics come first:
- Dry vs. wet or high-moisture products, which affects product-effect handling
- Packaged vs. bulk or loose product, which determines conveyor, gravity-feed, or pipeline format
- Product density and shape variation
Line specifications matter just as much:
- Required aperture size, based on package or product dimensions
- Line speed and throughput needs
- Available floor space and integration points with existing equipment
Facility conditions round out the picture:
- Hygienic or washdown-rated construction for wet processing environments
- Ambient temperature, humidity, and corrosive exposure, common in seafood or brine processing
- Electrical noise from nearby motors or conveyors, which can interfere with detection accuracy
Getting all of this right on paper is one thing; getting it right on an actual production floor is another. A detector sized correctly for a dry snack line will likely underperform on a wet cheese line running at the same speed, and vice versa.
This is where working with an experienced packaging equipment supplier pays off. Busch Machinery's engineering team consults with food manufacturers on quality control equipment, including check weigher and metal detector combination units. This work is part of building out a complete packaging and end-of-line automation solution.
Rather than selling a detector in isolation, the goal is matching equipment to the specific line, product mix, and budget it needs to serve. A system misaligned with its application tends to generate nuisance rejects or, worse, miss the contaminants it's supposed to catch.
Metal Detection vs. X-Ray Inspection: Which Do You Need?
Metal detectors and X-ray systems solve overlapping but different problems, and knowing the difference matters when deciding where to invest.
| Factor | Metal Detector | X-Ray Inspection |
|---|---|---|
| Contaminants found | Ferrous, non-ferrous, stainless steel | Metal, plus glass, bone, stone, dense plastics |
| Detection method | Electromagnetic field disruption | Density differences |
| Wet or salty products | Vulnerable to product effect | Largely unaffected |
| Foil or metalized packaging | Sensitivity often degraded | Performs reliably |
| Additional checks | None | Mass, fill level, missing components |
Metal detectors remain the standard choice for most lines because they're simpler to install, operate, and maintain. Busch Machinery's check weigher and metal detector combo units cover this need for most standard food and beverage lines.
But foil and heavily metalized packaging is where conventional detectors struggle, since the packaging itself produces a conductive signal that can mask a real contaminant. X-ray sidesteps that problem by reading density rather than conductivity, which is why it performs better on foil trays, cans, and similar packaging.
That capability comes at a cost. X-ray systems generally carry higher purchase and operating costs, and any fair comparison should factor in training, maintenance, and false-reject waste on both sides, not just the sticker price.
Some facilities run both technologies in sequence for higher-risk categories, such as ready meals packed in foil trays where a metal detector alone can't reliably clear the package's own signal. Whether that combination fits your line depends on:
- Contaminant risks specific to your product
- Packaging format and material characteristics
- Budget for equipment, training, and operating costs
Frequently Asked Questions
What are metal detectors for food safety?
They're electromagnetic inspection systems built into production or packaging lines that detect and automatically reject metal contaminants, ferrous, non-ferrous, or stainless steel, before products reach consumers.
How do you validate a metal detector in the food industry?
Validation means running certified test pieces at the critical limit size through the line at full production speed, then confirming consistent detection and rejection. This proves the system works before you rely on it for ongoing checks.
What are the limits for metal detection in food safety?
Common benchmarks for dry products run around 1.5mm ferrous, 2.0mm non-ferrous, and 2.5mm stainless steel, though limits vary by product and packaging. Schemes like SQF require each site to set its own limits via risk assessment, with retailer specs often tighter.
Should food go through metal detectors?
Most packaged and bulk food products should pass through metal detection as a standard HACCP control point. Metal enters production lines easily through equipment wear, raw materials, or maintenance work, making detection one of the most practical safeguards available.
How often should metal detectors be tested in food production?
A typical schedule includes a startup check, periodic checks roughly every 30-60 minutes, a check at product changeover, and a final check at shift end. Exact intervals should follow your equipment manufacturer's guidance and your site's risk assessment.
Can metal detectors detect all types of metal?
Yes, detectors can find ferrous, non-ferrous, and stainless steel contaminants. Stainless steel is the hardest to catch since it's typically non-magnetic and a weaker conductor than the other two types.